This weekend I decided to go crazy and rebase my old Orcs on new-fangled big 30x30 squares. To be quite honest, I promised myself I would only rebase Ruglud's Ladz, knowing full well I would get carried away doing that. Besides, I figured, rebasing a bunch of Orcs should only take a Saturday morning's worth of time (for me, starting any task requires a complete miscalculation of the time required to actually do it). So a full weekend and a few mid-week evenings later, here's a bunch of rebased Greenskins, ready to take on The Old World in style.
 |
| These ancient Orcs have always been based, now they have also been rebased! |
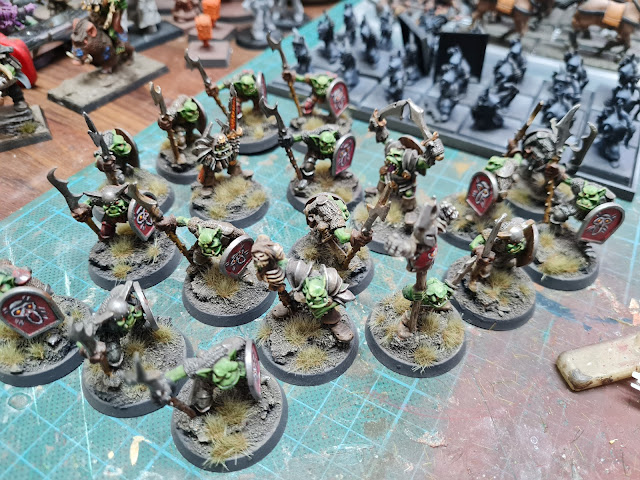 |
| Under the harsh light of my daylight panels, Ruglud's armoured Orcs say goodbye to their 32mm rounds. |
Pulling Ruglud's chaps off their round and boring bases was quite easy as I cut off the tabs years ago. I faintly recall someone pointing out that I destroyed their value with those snips. It still makes me smile as the value of a unit that I've been using (or fighting) since the late eighties goes quite a ways beyond silly eBay money people like to throw around. But I digress. As I was pulling the Ladz off their bases I thought 'why not snap a few extra pictures and turn this chore into a tutorial'. And that's what I did.
 |
| Back to square one(s), even if the new squares are a bit roomier than the previous versions... |
The first step towards rebasing a unit consists of sticking them on their new bases. I know, not all steps in a tutorial are quite as mindblowingly obvious as that one :). I covered the bases for this unit with a quick splash of Dark Earth Texture paint by Vallejo as it is rather easy to spread around when there's no one on the base. I stuck the Orcs on with cheap superglue while the texture paint was still wet. Superglue instantly (sort of) hardens on contact with moisture, making it this job quite easy (I only had to pick up and reattach about every third Orc).
 |
| 'Don't get carried away,' I thought, but did I listen to myself? |
Thanks to a trusty filament 3D-printer getting new bases (and more bases) is both fast and cheap. Perhaps this led me to the faithful (and foolish) decision to ignore the inner voice screaming 'Nooooooo!', choosing to take more Orcs out and rebase them as well. A quick Saturday morning later (about the time I had calculated the entire job would take) and I had rebased quite a large part of my Greenskin collection. Except for the chariots, I rebased those a while ago and will probably rant and rave about that later on. For now, let's move on to materials.
 |
| What do you need? Flock. Lots of flock. |
There are two important points when it comes to flock, tufts, and all the other stuff you can stick on bases. First, never use foodstuffs that have been wet before (I'm looking at you, moldy used tea leaves). Second, treat your basing materials as if they’re paints. Don’t just apply one color, use all of them*. As an aside, static flock is meant to be used by shaking it in a plastic container and sprinkling it on. Static electricity should make some of it stand upright. You can also use a static flock applicator to enhance this effect. Both methods aren't very practical for bases, especially when there’s a painted model already on top of it. Luckily, 'meant to be used' isn’t something you need to worry about in this hobby. After all, cardboard packaging is meant to hold stuff, not make rooftops, and deodorant bottles are meant to apply deodorant, not serve as tanks.
 |
| Grandfather Nurgle looked at the state of my cutting mat and smiled, knowing I vowed to keep this one in pristine shape when I threw out the previous one because it was covered in glue and paint. |
The other part is high-quality, ultra-professional tools...ah who am I kidding? The beauty of basing is that you can (and should) use the cheapest garbage tools at your disposal. Bases are even worse than scenery when it comes to your brushes. You'll be inflicting texture paint, PVA and other horrors on them, so go for cheap. Also keep a scalpel handy. It helps if you haven't changed the blade for quite a while, as it's mostly used to push things in place. A pair of tweezers, cocktail sticks, coffee stirring sticks and random plastic cups are very useful. I bought a big pack of small sauce cups a while back to use for these kind of projects, and I highly recommend them.
 |
| One of the less wonderful things about PVA is its tendency to stop flowing out of the bottle when it's still around half full. |
Last, but certainly not least, is your friend PVA or wood glue. It sticks well when poured straight from the bottle and dries as a thin plastic film when watered down. If you buy a new brand of PVA, be sure to test how it dries. Most versions dry nice and clear, but some have the awful property of drying with a white of yellowish tinge.
| Always keep a paper towel under flock and remember, whatever may happen, do not sneeze! |
With all the tools introduced, set up a work space on a paper towel. If possible, don't flock on the same surface as where you paint. Flock has the horrendous tendency to spread everywhere and hide, only to reappear after it has dried stuck to a freshly painted model. Also: don't sneeze when you have a lot of flock in front of you. I won't go into detail about how that nugget of wisdom was acquired...
 |
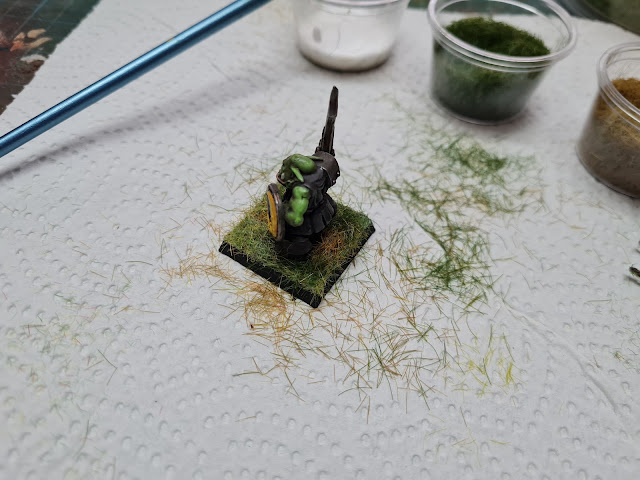
| Flocking tutorial, TL:DR version: Cover the base in PVA and add flock. |
On to actually applying flock. There are two approaches: easy and fancy. The easy one, modelled by our plastic friend above, starts with applying a nice, thick layer of PVA on the (dry by now) texture paint and applying flock on top of it. Why use texture paint if you'll cover it in PVA? Because the color underneath all the flock will always, subtly shine through and it gives you a chance to leave bare patches on the base.
 |
| Don't let the tweezers fool you: flocking does not require precision. |
I start with longer (5mm or 8mm) strands of flock, dropping different colors on in patches with tweezers. Alternating yellow and green helps the covering come to life and gives you a chance to contrast parts of the base with the model (I like to add a bit of yellow if the green above it is important).
 |
| What do you add after you've added flock? More flock! |
When there's enough patches of big flock on the base, I move on to a mix of grey-green and flat green 3mm flock (I mix two types of Woodland Scenics flock in an old GW cup). Just sprinkle it on top of the other flock and then gently shake some excess back off into the mixing cup.
 |
| And then more flock? You betcha! |
Next up is another mix of flock. I think this is some railway flock. It's very bright green, too green to look natural, but those tones blend in nicely with the other flock and sort of bring the entire mixture to life. I've used even more 'chemical green' looking flock in the mix for these bases.
 |
| Not all flock will stick, gently shake off the least attached bits, but don't get carried away here. More is better when it comes to this stage. |
The trick is to apply the flock as thick as you can. Then you gently shake off the thickest bits, occasionally sort of poke at it with your tweezers or dull scalpel and hope for the best. In the end the base should be covered by a thick layer of too loose looking flock, preferably with a few distinct patches of color to break up the monotony. Use a dry(!) spare brush to brush away flock that sticks to wrong bits of the model and use a q-tip (or your tweezers, if you have no fear when it comes to scraping paint off a model) to clear the top of the model's feet. Or keep the feet covered and never properly paint feet again!
 |
| Don't bother swishing (unless you're need a therapeutic Bob Ross style swish), just plant the brush in the water with its bristles down. These aren't Series 7s we're using here. |
When not taking pictures between steps, I apply PVA on groups of models. I usually work per rank (around 5 to 7 models at a time). The trick is to repeat the same step enough times to be efficient without getting too bored by the task (and before the glue dries too much to hold the flock). In between gluing I put the glue brush into a pot of water, exactly in the way you should never ever (ever) store a good brush. That's the beauty of doing a job that requires ghastly tools, you get to be rebellious.
 |
| Tufts on a paper towel. It's like paint on a palette. |
At this point in the job, it should be obvious why you want a paper towel underneath your flocking project (you will not be the only one substituting flocking with another f-word around base thirty). After completing the basic flock layer on a group of models, I carefully fold the paper towel and collect the mixed flock in an old GW flock cup (they are sized just right). I keep different colors of flock I work with in small sauce cups to make sure I have clean versions of the color I wish to apply, all the while keeping the bigger pots far away so I won't knock them over.
 |
| You have the cork, it covers the base. The texture paint covers the cork. The flock covers the texture paint. PVA covers the flock. Tea and flock cover the PVA. And the eye-in-the-sky covers it all, well it sort of takes it in and thinks its one layer of cover (oh dear, I shouldn't have attempted to mangle this quote, I wish I knew what a backspace key was, I could fix this, but here we are...) |
Anyway, while our plastic friend's easy base dried, I picked up this shaman on a boar to get fancy. To start with, I mounted the model on a bit of cork to give him some extra height. I'm not a fan of cork as a standalone basing material (even when painted), but it works wonders if you want to add volume beneath texture paint.
 |
| I love tufts, but I'm getting a bit tired of the old 'dry patch with three bits of grass sticking out'-bases. |
The main difference between fancy flock bases and easy flock bases is extra covering. On bigger (and fancier) bases I add tufts, Icelandic moss or even painted greeblies like mushrooms to give the undergrowth more volume and character.
 |
| Even though tufts are supposed to be sticky, I can never refrain from adding a dollop of PVA. |
Before I cover the base in PVA, I stick tufts in interesting places (and on mistakes, like cracks in the cork, spots I missed with texture paints, badly placed pins that hold broken models up and the like).
 |
| I really hate seeing close-up shots of my models on big, modern computer screens. Especially when they show a model I painted quite a while back. |
The next step consists of slathering PVA on the rest of the base. I almost forgot to mention that you should remember to wipe off excess PVA from the edges. I usually start with a q-tip to keep my fingers clean, and end up using my fingers anyway.
 |
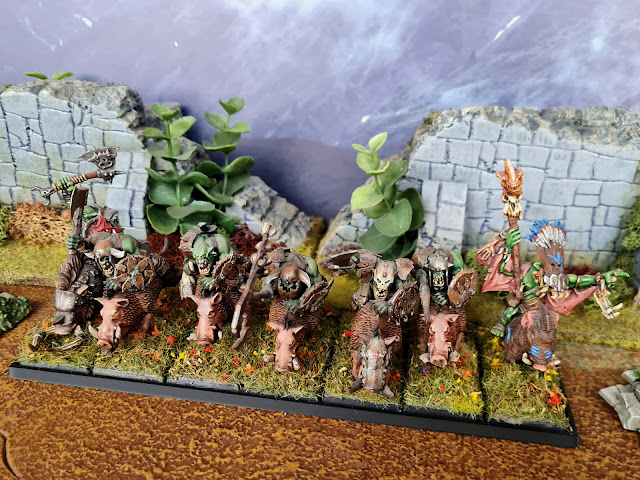
| Now there's a grassy base any old Orc can proudly run through, or in this case make his boar run through. |
At this point, the fancy method and easy method intersect, and you just go back to applying patches of longer flock, then go for the smaller and mixed flock to cover the base. Don't shy away from hitting the tufts or other added bits by accident. It'll only make the end result look better (nature isn't neat).
 |
| Mixing static grass is awesome. I never ended up with a mix I didn't like. |
At this point (or in my case at multiple points in the process), you'll have gathered quite a mix of different lengths and colors of flock. This is awesome stuff. Pour it into a container (like my old GW flock cup) and save it. We'll be using it in the next step.
 |
| Don't let the illusion of stuck-on'iness fool you! DO NOT SNEEZE! |
Somewhere around this point of the exercise, you'll have a whole bunch of models on relatively nice looking flock bases. You might even consider stopping here and calling it done. You shouldn't! For starters: I'm not done blathering about basing. Aside from that: if you leave it as is here, your army will leave a trail of flock behind wherever it goes. It'll make anyone hosting a Warhammer evening curse your army (for all the wrong reasons), as your bases slowly go bald.
 |
| Water and PVA results in watery PVA. Perhaps shooting a bit of video would've been more useful in this instance. |
The trick to keeping flock where it should be (mostly), is watered down PVA. I cleverly mentioned this earlier in the article to build up to this point. I mix water and PVA in about a 50/50 ratio. I have to add that I eyeball the mix and I'm very relaxed and careless when I'm hobbying, so take that ratio with a huge grain of salt.
 |
| Mr. Orc, are you ready to meet mr. Brush? |
Anyway, you should have watery PVA that flows off your brush like a slight thickish wash. Take out one of your ghastly glue and terrain brushes and get ready to cover your covered base again. The brush above is my favorite for the task. Its bristles are too long, probably a QA-miss in the cheap brush factory, making it perfect for applying globs of runny glue.
 |
| Next step: the final touches on the base. |
If all goes to plan, your base should look something like this. I don't push the paint onto the flock as that would push all the flock flat. Instead I allow the watery glue to run down onto the base. It keeps most of the flock more or less in a random position.
 |
| Tea, especially herbal tea, makes for wonderful basing material. It even makes your models smell nice (most of the time). Use it on Nurgle bases to confuse and confound the enemy! |
Now it's time to apply materials that'll make the base look more interesting. For my Orcs I've used small leaves (I bought them through AliExpress some time ago, I think they're painted birch seeds). I also sprinkle a bits of yellow and red painted, ground-up sponge (another great investment from the previously mentioned source). To round it all off, I sprinkle a mix of Green Tea (with a dash of lemon) and some vile herbal tea (Star Mix or something) over it all. Tea (unused, see the mention of mold on bases above) makes for great basing material, especially herbal teas. Black tea is rather boring. Oh, before I forget to mention it: if you want to add skulls and the like, place them in between the grass somewhere around this point of the process. Add a dollop of undiluted PVA to the bottom to make sure they stick to the base.
 |
| And we're done...do not throw your runny glue brush away with a flourish, it will leave a trail of runny glue if you do! |
Finish the base by taking a bit of the saved flock mix between your fingers and carefully sprinkle it on top of everything else. These bits will stick up slightly and tie all the layers together. As a final step (after cleaning your fingers), use a q-tip to clean up the rim of the base (don't allow the runny glue and fickle flock to dry there). Finally clean the feet (if you feel like it), poke a few bigger bits with a scalpel or cocktail stick to make sure they stay in place and check if you haven't accidentally flocked someone's shield, sword, legs or other parts that usually aren't covered in grass.
 |
| Six Orcs done, more than sixty Orcs to go...sigh...Why don't I ever listen to myself? |
With a bit of perseverance (and a lot of grumbled curses) you'll slowly get to the point where all your models are standing in a field of green and (drying) white PVA. After this has dried, you should paint all the base rims again. I'll be the first to admit I only thought of that as I was going through the pictures for this post. I promise I'll do it at some point in the future...
 |
| Ruglud's Armoured Orcs are back on their squares, and ready to rob more Dwarves*. *The definition of Dwarf is broad in this context and defined as 'anything that moves'. |
After the PVA has dried, you should end up with a unit looking like this. Look at how good old Ruglud smiles, knowing he's back on squares after a few years fighting on rounds. I should paint and add the crossbow to the unit, but I know I won't. There are no official rules for crossbow wielding Orcs anymore, and I never really liked the look of the added crossbow on these models anyway.
 |
| Azhag the Slaughterer is ready for a bit of a kerfuffle, even though he hasn't been born yet in the 'official' timeline. Let's just say that the Crown of Sorcery has made him clever enough to surpass a small challenge like that. |
 |
| I'm considering singing the trollollol-song to avoid mention of the base rims that need another layer of paint. |
Removing the themed swamp bases from my old Trolls was hard (I quite liked them). I used my Brettonnian swamp mix on these bases (except for the Troll hag, she has an integrated base). I actually painted and repainted the rims on the classic metal Trolls, but it seems they need another layer of paint there.
 |
| So after literally hours of cursing and pushing the damn carts in a position that they can form up in a rank (I even cut off bits of a few scythes), I finally read the rules and discovered heavy chariots move as a unit, but never form a unit (of more than one). |
I actually rebased the chariots a while back, but I never got around to putting flock on the new too-small for my taste bases. It was only as I was checking if trolls really don't use 50x50mm bases that I discovered heavy chariots never move a a unit in The Old World. I will not go into detail in how much effort I expended to make a block of three line-up properly...Let's all gasp in joyous wonder at my Mad Max Fury Road guitar playing Orc again :D.
 |
| I love the face of the chief Black Orc. I think its actually from the plastic Black Orc set too. I'm quite chuffed that repainting it brought out his expression even more. I'm almost inspired enough to repaint even more Orcs, if only my paint station wasn't crowded with other projects... |
I retouched and photographed these Black Orcs for my other Greenskins post. As that picture was rather bad (and I added some not-so retouched older models to the unit), I just took this as an opportunity to take another shot.
 |
| I briefly considered touching up this lot, but considering I don't expect to ever field an army that actually has thirty Black Orcs in it, I don't think I will. They look good enough as is. |
These are not the same Black Orcs, but just more of them. I have too many Black Orcs...if one can ever be said to have too many of any sort of Greenskin....
 |
| I love the new plastic Boar Boyz (and I use the word 'new' here quite liberally). Not just so much for the Orcs, rowdy as they are, but mostly for the boars that actually look cool. Especially next to the (rather unfortunate) older plastic boar model the shaman is riding. |
Rebasing these modern plastic Boar Boyz was hell. The models are attached to the base by one leg. These flimsy plastic bits easily snap off if you apply pressure. I ended up cutting them off with a bit of the old base still attached, and used that to stick them to the new one. Texture paint covers many sins, including this one...
 |
| Harboth's Orc Archers sans Harboth. Don't worry, I haven't lost him (he's too cunning to ever be truly lost). |
These Arrer' Boyz are as old as Ruglud's unit. Both when expressed as a product line and as part of my collection of miniatures. I think I used them once in this millennium. During the very early days of Age of Sigmar I stuck the lot on rounds and had a blast shooting with Orcs that could actually aim. Good times. I plan to stick them on the table as a unit of 25 soon, just to see what happens.
 |
| There's Harboth! I've added him to Da Radom Bunch. An intrepid unit of random (but rowdy) Orcs. It's my way to cleverly bypass paying for a boss in a unit of archers (I have yet to discover if this is as great a plan in-game as it sounds like on the planning board). |
This is the same unit of 25 Arrer' Boyz with a small contingnent of extra Orcs attached. I've added Harboth, his musician and his Banner Bearer to a fresh unit of Orcs that's slowly forming around random Greenskins that roll off the paint station. It's funny how these 35 Orcs somehow look like a smaller bunch than the 25 above. As an aside, I'm considering removing and redoing the shields on the Arrer' Boyz. I applied transfers (badly) back when I painted the lot, and I no longer like the look of them.
 |
| Random Orcs forming a unit of Big 'Uns. I think most of them were actually sold as such at one point in GW's history (their fellow Orcs just managed to outgrow them!) |
These 12 Orcs are my planned unit of Big 'Uns (I still think of Al Bundy when I hear that term). I'm assembling this unit much in the same way as Harboth's new outfit. That is to say, I randomly add Orcs that seem to fit into the lot. For those of you wondering, the pale Orc in the front rank on our left is one of Die Hard's Orcs. I really like the line, but I'm worried about adding even more Greenskins to my collection.
 |
| My only unit of plastic Orc Boyz. I really should paint some finishing touches on them... |
 |
| A Battle Standard Bearer and one of my giants. This one has mostly been spending his time falling over drunk in the Mortal Realms. It'll be a joy to see him fall over drunk in the Old World. |
Because I'm a non-native speaker, I think I can get away with following up 'last, but not least' with another picture. The Battle Standard Bearer on the left was the easiest model to rebase. I pulled him off with the stone he was mounted on still attached and glued a fresh base underneath it. Even most of the tufts remained attached during the process. The giant on the right recently returned to me after an extended stay over at a friend's house (I forgot to pack him up when the battle was over). I have a second version of that giant somewhere that I really should paint one of these days. Ah so much to do, so little time. All I've got left here is a sincere 'happy basing' to all of you planning to add some decor beneath your model's feet. I'm going to spend a bit of time pondering whether I should repaint my ancient Man Mangler, or leave the poor model alone...Decisions, decisions...
Oh wow, a whole post of lovely orcs.
ReplyDeleteLovely to look at individually and stunning en mass.
The basing tutorial is really useful. You may have just stopped me making a disastrous mistake with dried out tea.
Cheers, it may just have been me, of course, but I had a bit of a horrifying experience using (re-dried) ground coffee. I thought it looked perfect as a fine alternative to sand, and it did. Months later the miniatures I'd used it on (Nurgle worshippers, but that was a happy little accident) had a mysterious looking mist around their feet. It took me a few seconds to place the look (and smell) before I realized the (awesome looking) effect was mould. I had to strip and repaint the models to get rid of it.
DeleteSo allow me to be a grognard. That is static grass not flock. Flock is colored sawdust.
ReplyDeleteYou are absolutely right, I'll award you 5 points towards your next Grognard's trophy :)
Delete