Adhering to my schedule I've finished the unit of seven Death Guard from the Dark Imperium box set over the weekend. As with the Poxwalkers these models are beautifully modeled although to my taste some bits are too fragile for gaming. I'm not Atilla the Hun of painters but still two grenade tops broke off during painting and the green smoking incense stencher (center on the picture below) broke off during photography. That said I still think the unit looks fantastic and I can't wait to bring some plague and disease to the corrupt imperium and its corpse god.
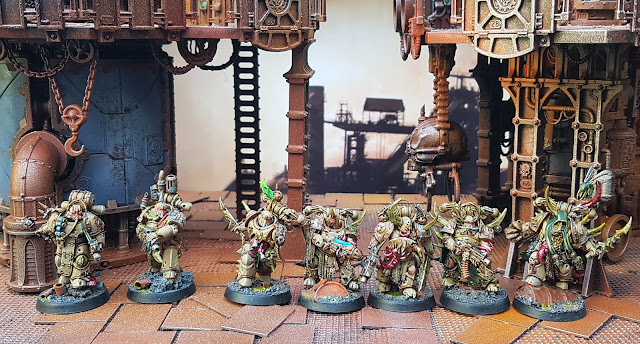 |
| "Death to the false...cough hack urgh blegh....emperor!" Perhaps I should call this unit the Charmers....oh dear I should've converted one into a banner bearer. |
For the color scheme I opted to stay away from the obvious greens (I admit its hard to tell from the picture). At first I looked through the old Realm of Chaos (Lost and the Damned) book for inspiration, but green seems to be the color of choice for the Plague Legion even back then. I then took seven old metal plague marines and attempted to follow a YouTube tutorial on painting the original Death Guard color scheme (bone armor with green shoulder pads and copper/gold trim). The result was a rather dismal failure that has been quietly stowed into a storage container in the shed (sssh don't tell anyone ;) ).
 |
| I love the detail on the models although some of it is a bit too easily snapped off to my taste. |
Still unwilling to go for green I ended up going for a base of Zandri Dust. I had some left over in a basecoat rattlecan anyway so why not? After the Zandri I applied a solid coat of Seraphin Sepia, I wanted to avoid Agrax at first because it (in part) ruined my earlier experiment. The trim was painted in Balthasar Gold, it is a lovely base to punt under both gold and copper (in my opinion). I opted to paint the robes green as a nod to the old shoulder pads, applied Leadbelcher to the metal parts that weren't gold already and used Incubi Darkness for anything that had to be black. Every bit of tentacle was based with Screamer Pink. In the end the Sepia just wasn't dark enough to my taste (and I had to wash all the other colors as well) so I used Agrax Earthshade anyway. I went for a thick layer, hoping to really get some contrast in there. With one tragic consequence.
 |
| Noooooooo! Another shade pot empty, at least this time it wasn't due to knocking it over. |
After the way too thick wash dried I applied a thinned down layer of Zandri back onto the armor and finished off with Ushabit bone highlights. I used Sycorax Bronze on the copper (or should I now say bronze?) bits with no reinstating the Baltahsar Gold base. Regular metal I softly layered with Stormhost Silver. I did this mostly because every Nurgle guide tells you not to go for bright silvers and I was feeling particularly contrary at the time. One of the bigger problems where the horns sticking out left and right. I painted these Ushabit Bone with the (in hindsight) obvious problem of zero contrast with the armor. Remembering the effect on the
Poxwalkers I tried fixing this with a wash of Athonian Camoshade. That did not really do the trick. I highlighted the purple/pink fleshy bits with Vallejo Squid Pink. Not wanting to go for the standard layer of Kabalite Green I mixed the Incubi Darkness with some light grey to make a highlight.
 |
| I suddenly realize I should've made the rim of my bases brown, or did I go for black on the Poxwalkers? Oh no it was brown and Dryad Bark there, German Grey and black here. Something to be fixed at some point I guess. |
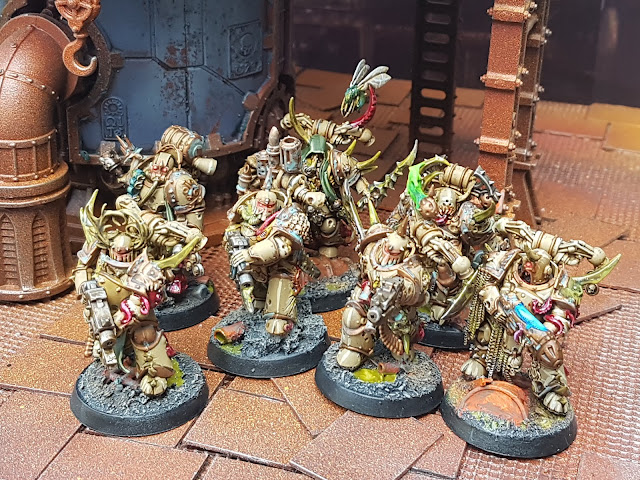
With all the base parts painted I went for the details. The eyes or lenses (where present) were given a base layer of Evil Sunz Scarlet, followed by a dot of Lugganath Orange and a glaze of Bloodletter to give a glow effect. The plasma coil was painted with a few blue colors. I briefly considered giving it a sickly green glow but I decided it would contrast more if I changed things around. I also freenhanded some lines on the bloated fly's wings just to have something to point at during a battle. With these steps finished (and everything dried) I affixed the models to bases I actually made for the failed experiment. That was a bad idea as the models don't quite fit on the bases. Still, I'm unwilling to switch this around. Maybe I'll go back in later with some textured paint to fit the feet in a bit better. As the last step it was time to Nurgle the models up.
 |
| I love the look of glowing effects but while painting it I always feel as if I'm deliberately making mistakes and sloshing paint on the wrong part. I have the same feeling while going for OSL through overspray with an airbrush (and that is the reason the plasme gun in this unit produces no glow, should I go back and fix that? hmmm). |
I applied dabs of Nurgle's Rot to select bits of the models like rips in the armour, blades and most importantly all the horns. This has fixed them (at least in my opinon). I then used Blood for the Blood God on all the pink tentacles both toning down the pink and making them look even grosser. I then used Vallejo Smoke (I love this paint) to make the bright silver bolters and chainmail dirty. Just dab on a small bit off Smoke and use a second brush to sweep it down into seams. I almost skipped the Nihilakh Oxide for the copper bits but I wanted the Plasma Gun to look really ancient. With the Nihilakh applied there I decided it should be added to the other copper bits as well, it just looks right and adds some extra color. Before the grossing up stage I was still wondering if I should stick these models in the box with the rejected test models, with the filth applied I'll quite happily stick them on the table. Next up the final four Nurgle models from the starter set (although three distracting side projects (five if I include the still open Grudge of Drong projects) are begging my attention...must focus....).


Really like how these turned out. You did a good job of showing off all the fancy bits, while still making the paint jobs readable, and not just a mash of detailing.
ReplyDeleteThanks it is rather hard not get utterly lost (or intimidated out of painting) with the details on these new models.
DeleteI find that GW figures in the last few years anyway have gotten much better in terms of sculpt quality, but also increasingly complicated with details. Sometimes less is more!
DeleteLooking good, I'm going to have to relearn to paint my old scheme with new paints, but I might paint some HQ or EL models in some new Nurgly style.
ReplyDeleteCheers :) Its always a hassle to get an old scheme working with new paints (my Space Wolves are looking at me very sternly as I type this, I really should've bought an extra bottle of the older Space Wolf Grey when I had the chance). Good luck and enjoy the process :)
Delete