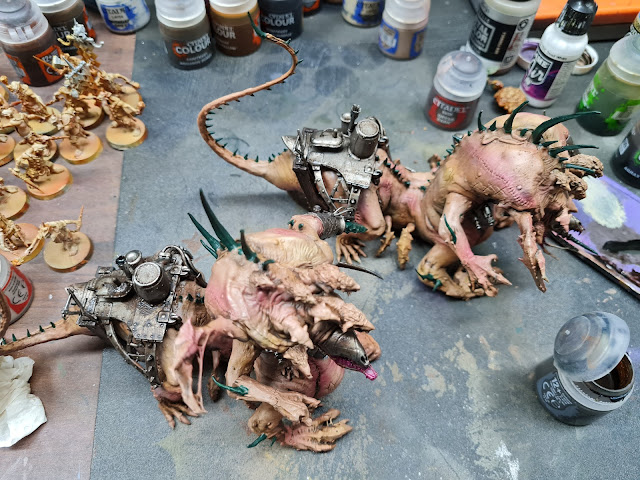
Almost six years ago I finished my Skaven Hell Pit abomination Buddy Since that day he's seen quite a few battlefields. As he survived no battle so far, I thought it was past time to get him some friends and a proper handler. Without further ado: here's a group shot of Buddy (a GW original), two 3D-printed friend (yet to be named) and their handler, a Master Moulder (by GW).
 |
| Okay I've named the center one 'Buddy', perhaps I should name the one on the left 'Fluffy' and the one on the right 'Spot' (<- deft McDeath reference right there (also misplaced, but let's ignore that)). |
A few years have passed between painting Buddy and his new buddies, and I think you can spot some subtle changes in skill and painting style between the old and the new. I'll be throwing up soms work in progress pictures lower in this post (to give me space to yap about painting). The two new abominations where printed using a free STL (this one) on a rather large resin printer I had access to (a big thank you to my brother, who actually owns that monster). The two models weigh quite a lot and came out slightly bigger than anticipated (and larger than the GW original). But that doesn't really matter. They fit their bases (sort off) and they are supposed to be slobbering hulks of tissue anyway. I'll just file it under self-inflicted scale creep ;).
 |
| When a problem comes along. You must whip it. |
Before going on about the monsters I want to blab a bit about this wonderful (metal) Master Moulder model (by GW). I bought him quite a while ago (fearing that he'd go out of production or (worse) be rereleased in Finecast). I needn't have worried. It's still available today. The reason it took me so long to paint it, was that it is a very difficult figure to paint (in my humble opinion).
 |
| Before the cream sits out too long. You must whip it. |
I've dipped the model more times than I care to count. Every new attempt to paint him came out worse than the last. I have a comparable story when it comes to one of my (as yet unpainted) Warlock Engineers. High King Thorgrim Grudgebearer also comes to mind in this regard.
 |
| When something's going wrong. You must whip it. |
Well quite recently my airbrush's nozzle died (I shared a picture in the Plague Monks post) and I was reduced to using brushes only. As I was wondering what to paint I saw this guy looking at me with big, teary Skaven eyes. Al he had was a zenithal basecoat on him so I took heart. I decided to stop worrying about color schemes or intent, and just splosh on paint as whimsy took me. A few hours later he was finished. I am - extremely - chuffed with the result. But enough about the Master Moulder, let's get back to the monsters this Master Moulder creates (lorewise).
 |
| Fluffy likes to cuddle on the couch and enjoys digging on the beach. |
The joy of the 3D STL-files of Hell Pit Abominations above GW's model is that you get to choose from different poses. The plastic Hell Pit Abomination doesn't offer any serious options, so taking three means you have three large creatures on the table with the exact same pose. Snore. Regardless of the choices I was offered, I still couldn't resist cutting this guy's left warpstone mace off his arm. I wanted to replace it with a warp grinder spike from my Stormfiend bits collection.
 |
| I was originally planning to add some red to the spots where metal cables dig into skin, but in the riot of color, it just wasn't necessary (I think). |
After printing the resin models weren't fully cured (stuck in a UV box). This made it easier to cut the horrifying forest of supports off. Of course I clean forgot to stick them in sunlight for a few days after. This kept the resin slightly flexible, like cheap miniatures you get with certain boardgames. I'll call it a plus. Hopefully this will prevent breakage in the future. My way of transporting miniatures can best be described as a deranged sort of cavalier uncaringness.
 |
| A wonderfully pretty clump of white flowers is about to be destroyed by Fluffy. |
Lets start talking about paint already. The two monsters (fresh from the meat pits operated by Clan Moulder) have a metal contraption on their backs that's fused with their meaty selves. I painted this in a bronze sort of color on Buddy. I discovered the wonderful paint pots by GW (that have stood untouched for quite some time) managed to harden out (what a surprise /s). As a result I was completely out of bronze. Not wanting to stop painting I decided to go for a Dark Aluminum look. This is a rather bright metallic from the Vallejo Metal Color line (that I really like). I washed this metallic bases with Agrax Earthshade and then applied Typhus Corrosion in interesting amounts into nooks and crannies (and onto flat surfaces). When this dried I added Orange Rust (Forge World) weathering powder. I've been meaning to do more with weathering powders for quite some time now. I fixed this with a bit of White Spirit and then coated it in mat varnish. When this dried I applied a metallic drybrush to give it that metal look back. I think I managed to make it look quite hard worn.
 |
| Out, damned spot! Out, I say! |
I kept the mace arm on the second monster and had quite a bit of fun painting the warpstone that's inside it. At this point I should mention that my usual approach to warpstone (these days) is Caliban Green, Warpstone Glow, Moot Green followed by Vallejo Model Color Yellow Green. When whimsy strikes me I apply a thin coat of Vallejo Green Fluo around warpstone with the airbrush. I didn't here (I forgot). I might go back and add it later.
 |
| That drill bit in the mouth looks so horridly evil, you can just imagine it bursting forth like the chestburster in Alien. |
To get the main mouth to stand out properly I painted it (roughly) with Screamer Pink. The trick to slobbering beast's mouths is to paint outside the edges too. I picked the teeth out using Rakarth Flesh. Now there an odd color I just keep using in inappropriate places. It's sort of off-white but darker with a hint of fleshtone. I hope GW never discontinues this paint (I know: hope is the first step on the road to disappointment). I love Rakarth Flesh.
 |
| I'm still considering adding a spare Skaven to the back carriage of this monster. I think it'd look quite interesting. |
The Hell Pit Abomination has a belly wheel (maybe they can double as fatties in a Judge Dredd game). I'm not completely happy with how these wheels turned out. On the bright side, they are hidden deep beneath the model, so no one will notice. As a last point here, I'd like to admit that I've based them with a bit more tufts than usual. I just couldn't resist adding some flowers to their bases. A big slobbering monster standing in a field of flowers just adds that subtle touch of horrid violence about to happen (I think (or maybe I'm just crazy)). On to some WIP shots of the skin painting
 |
| Start of the process, you can see one of the MDF bases I used to base these creatures. |
I started by spraying one of the monsters with GW Bugman's Glow and the other one with Scalecolor Ressurection Flesh. I intended to make one darker than the other. This did not to work out as planned in the end. But you can't blame someone for trying. After applying the base flesh tone I mixed blue and cement grey with the skin color. With this I added a greyish-blue tone to shadowy places (and a few other patches where whimsy took me).
 |
| A rather important lesson when it comes to painting is: don't fear color, just go for it. |
I've been reading (and watching) up on (dead) skin color painting and the main gist I've taken away from it is: don't be afraid of colors. It's comparable to painting stone walls in that regard. Go wild with color, it'll just look cooler. Here's me adding blasts of purple to shadows and interesting places.
 |
| Its like a trance party without the glowsticks. |
Going even wilder I added splotches of yellow, just to make sure I got a lot of things going on with the models. I also blasted on a few patches of dirty grey-green.
 |
| ...and its been toned down again. |
At this point I loaded my airbrush with Ressurection Flesh and (zenithal) sprayed down to give the skin a bit more skin tone back. I lightened my color by adding (Scalecolor) Pale Skin to the fleshtone. And added a few nice highlights.
 |
| Disco will never die! |
From the eye, this took a lot of the horrid looking crazy colors away. But in truth they are still there. Just a bit more subtle. Here's a shot from the bottom side of the creatures after getting a bit more skin color back. You can see the riot of colors still working on the belly and chest. It also looks like one hell of an awful bruise.
 |
| Perhaps the Packmasters should stop bouncing these poor creatures around like basketballs. |
Another one of those shots...have I missed my calling? Should I have been a hand model?
 |
| Adding a bit of airbrushed contrast paint to the mix. |
After washing the Hell Pit Abominations with a watered down mix of Athonian Camoshade and Agrax Earthhade all I had to was wait until the wash dried. Then I loaded my airbrush with Contrast Paint. I've been using it as a base color for my Kruleboyz, but to be honest it hadn't occurred to me to use it on anything else. A friend of mine mentioned having an awesome time airbrushing contrast paint. Reading that, I had to give it a go. I used Volupus Pink on everything that looked like an infected wound. It is true: airbrushing contrast paints is awesome.
 |
| Some assassins waiting for me to figure out proper black in the back. |
I also blasted small patches of Plaguebearer Flesh to turn bits of skin a bit greenish.
 |
| Oh no! All my hard work covered in a layer of gunk! |
At this point I decided to take my insanity up to 11. I gloss coated the models and then I loaded my airbrush with an Enamel Streaking Grime by AK. This turned all my beautiful work into the brown you see above. Time to fire up the defibrillator and shock the heartrate back to normal.
 |
| White Spirits to the rescue! |
Using makeup sponges and eye makeup sticks soaked with a bit of white spirit, I cleaned the brown gunk from all but the recesses. Instant awesome contrast. The disgusting brown mottled thing in the back center is what's left of a brand new makeup sponge after contact with all the spikes on the models.
 |
| Shiny happy back carriages holding hands (okay I'm running out of useful lyrics to quote (and I don't have anything useful to say)). |
As this crazy post is running LONG I should try typing shorter sentences I guess. Shortly: here's a shot of the back carriage and other metals painted Dark Aluminum. Shiny! Also worth mentioning, I collect the caps of milk cartons, degrease them (with dishwashing liquid in water) and then use them as throwaway mixing cups. Its better for watering down inks than a flat palette.
 |
| On the left you can see a bunch of thoroughly airbrushed Hobgoblins. |
After applying Agrax Earthshade I forgot to take a picture. So here's one of the model in the process of getting Typhus Corrosion added. The top model only has Agrax Earthshade on its carriage.
 |
| Weathering powders are quite easy to apply and look awesome after , so why don't I use them more often? |
And a final WIP shot with weathering powder added to the back carriage. I stupidly forgot to put a paper towel beneath the models while applying the powders, so I'll be needing to scrub done my painting placemat thoroughly now. Hint for everyone else: put a paper towel beneath models before applying weathering powders, of spend quite a large number of your days with weathering powders on your hands, elbows and other models.
 |
| One day I'll find a bunch of bedraggled looking armed monks to fight out the Maisontaal battles with (suggestions are most welcome). |
Because this post has way too few pictures (har, har) lets finish up with one more. I just had to photograph these guys in front of Maisontaal. That sounds easy, but turned out to make fitting it all in one 4:3 shot quite challenging. Still it is nice to see the ancient monastery with a slightly less ancient model from (I think) the start of the millennium joined by what is most likely (a serious part of) the future of wargaming: 3D-printed monsters. What a joy these models where to paint. I'm tempted to look for more of this now. Perhaps some nice city blocks for Adeptus Titanicus maybe?
Nice. Well, not nice, but well done, if you know what I mean.
ReplyDeleteI'm not up on modern GWW terminology, Master Mould sounds like an X-Men reference to me (heathen that I am)
Heh, nice in a disgusting sort of way :D
DeleteFortunately for me he was not in the X-Men, I wouldn't want to see a Skaven in spandex to be honest ;). A Master Moulder used to be a Skaven hero (beneath lord, above packamster) starting with the 6th edition Battle Tome (2002). This particular model (had to look him up) was originally introduced as a named character, Skweel Gnawtooth, in the 7th edition Battle Tome (2009). Quite a recent model now that I've looked him up :)
I've always really liked the skaven abomination, even though I converted mine into a sea monster a couple of years ago. I like the suitably rancid colours you've used on them and the unwholesome feel of the skin. I think a skaven riding/surfing on the mechanical parts could look pretty cool.
ReplyDeleteThanks, I think you are quite right and I will be adding a monster-surfing Skaven to at least one of these models.
DeleteNice work! Congrats on your results (and completing the mutated rat pack)
ReplyDeleteCheers :) Does completing the Rat Pack make it mandatory for me to name at least one Skaven mr. Squeeknatra?
DeleteUgh.. bruised and tender flesh, rotting and painfull.. awesome job! Three abominations to give the enemy soiled undergarments, they look intimidating to start with and together, quite terrifying.
ReplyDeleteSkweel looks good - I did what you did, picked my paints and just went for it, he's one of my favourite old characters along with the Jes Goodwin original Throt.
Do you have any wolfrats?
Ah the original Throt is awesome, I quite recently repainted one (I have two). As for Wolfrats alas, I didn't buy them when I had the chance and now they are quite unavailable. If you know of a proper stl or a nice alternative model supplier I'm very open to recommendations.
DeleteCheck out Forgedterrain ratmen 3D printed resin miniatures.
DeleteThanks for the tip, I've bought the STL's for the Wolf Hounds and some Poison Wind Globadier types. Can't wait to get some prints of these.
DeleteOoo I look forward to seeing what theyre like, glad to be of help.
DeleteMore great additions to the hordes of ratfolk! I really like all the colors you put into it. More color is definitely the way to go after seeing these monstrosities!
ReplyDeleteThanks, also adding extra color is just a lot of fun, especially at that magic stage where it looks as if the model will never come out okay (assuming it does turn out alright in the end of course :)
DeleteThose are great! Well, gross, but in this context that is just great.
ReplyDeleteAgree with Toby that some lesser rats riding around on top of these beasties would be good.
Cheers, riders on the back it is. Should I rename one of the beasts to Squeek-Hulud in that scenario ;)?
DeleteLol, well that would be pretty peak GW, so yes!
Delete