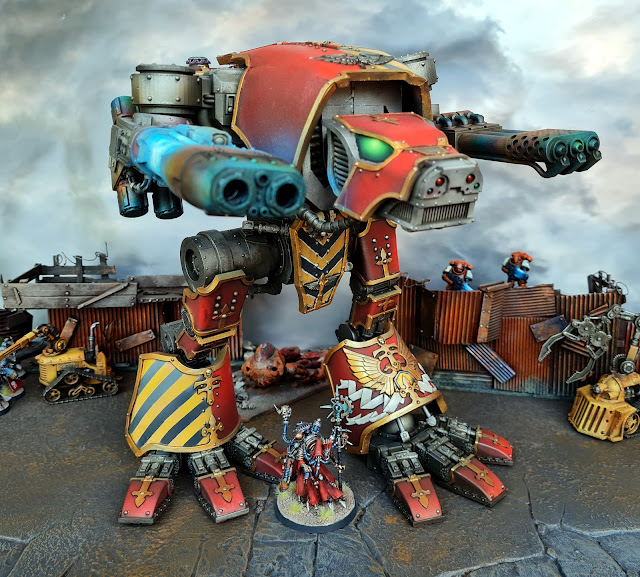
Lets start with a very short observation: I love titans. I was awestruck seeing the iconic John Blanche artwork gracing the cover of White Dwarf 108 and that feeling hasn't subsided since. It inspired me to paint a whole bunch of (new) epic scale titans a few years back. Now, with a 3D-printer just begging for work (and lacking common sense), I went ahead and printed a 28mm version of a Warhound class Titan. I got so enthused, I managed to slap paint on it faster than the time it took to pull the parts out of the printer.
 |
| I really need to think up a properly menacing name for this thing. Suggestions are very welcome :) |
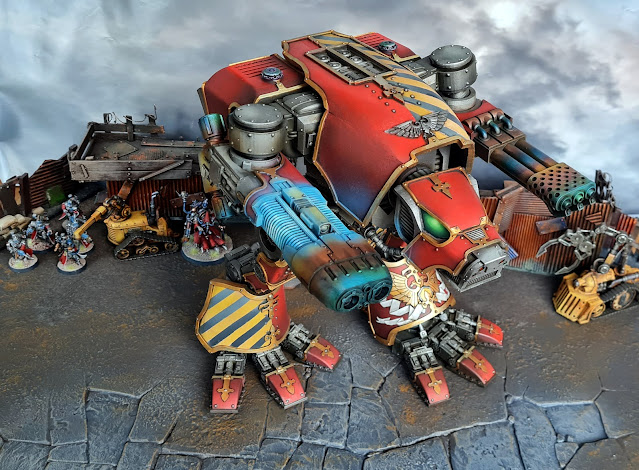
For those of you reading along and thinking 'hey, that picture is definitively not in the 4:3 aspect ratio I'm used to seeing on the blog.' Well spotted! Standing at 26.5 cm (10.4 inches) tall (and weighing 1993 grams) this titan makes even my largest backdrop too small for wide shots. I didn't want to spoil the grim dark future with my rather pleasant living room, so I had to make cuts at odd aspects. Sorry.
 |
| Painting heat effect is almost as fun as painting rust. Perhaps I should start planning on painting some of Snagrod's boyz. If the arch-arsonist of Charadon isn't into rust and heat then I don't know who is. |
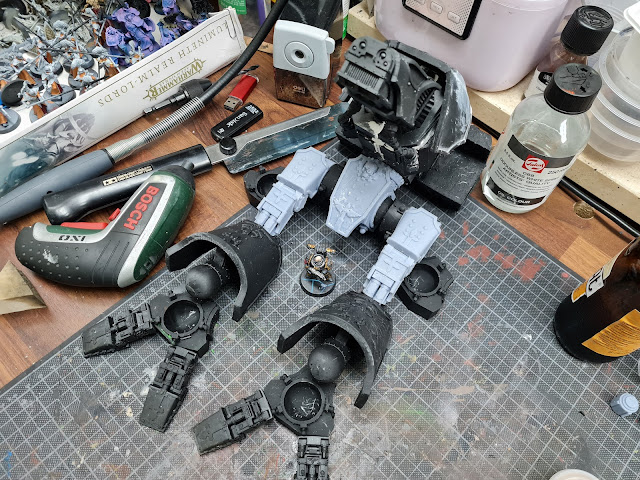
After failing to print a Thunderhawk (the resin warped and I lost patience) I decided to stick with printing smaller models. Unfortunately as an intention that is about as easy to maintain as not buying new models until the old ones are covered in paint. Within no time at all (after an evening's spent checking out 3D models for titans) I had both Warhound and Warlord titan STL's sitting on my hard drive, begging to be printed. With my build plate way too small for a Warlord, I decided to ignore that one for now (maybe I'll just print the head in a little while). I could, however, print the Warhound. All I had to do was chop up a few strategic bits in Meshmixer and hope for the best. Lets hop on to a WIP shot.
 |
| Its's almost like one of my daughters dolls, just a lot more fragile (as I discovered when pieces of the side of the Warhound's head broke after dropping it.) |
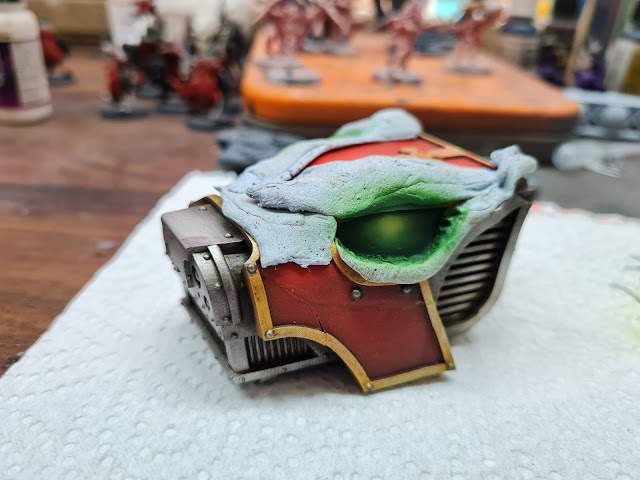
Here are a few parts. For those of you 3D-printing vicariously through this blog (welcome!) I learned quite a lot of new and interesting things (to put it mildly). First of the black resin I've been using thus far is very good. I discovered this when I bought a rather cheaper grey resin. This works, but it doesn't hold detail all that well. Aside from that bit, I also learned you can print only so much until the reservoir runs out of resin. The white lines above behind the head are air dry clay I used to cover gaps where I had to print an emergency repair after having to improvise a missing bit that failed to print due to a lakc of resin. Luckily the most hideous of joints are hidden behind the carapace (I suspect hiding printing mistakes is the actual reason titans have a back carapace in the first place (those sneaky mechanicum tricksters!)).
 |
| It took about twenty hours to print, but it does look good, worth it! |
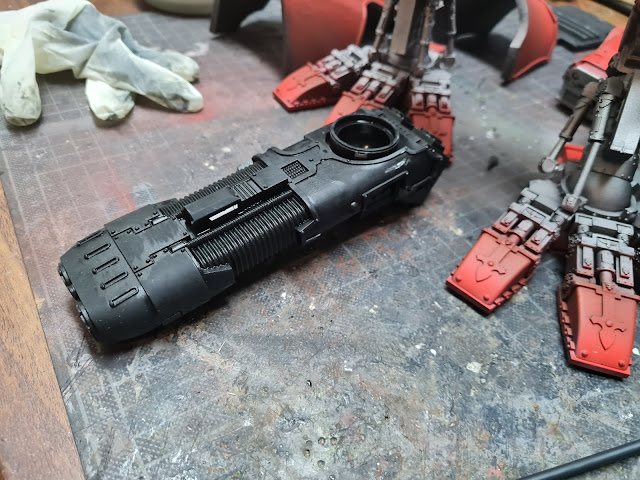
Seeing most of my original prints tearing themselves apart a few weeks after printing, I've decided to (at least temporarily) stop hollowing out models (I think that's the cause). It doesn't save all that much resin anyway. Printing the parts was a lot of fun. I had to cut the carapace in three pieces and the body in two. The guns came out in one piece, taking up the entire print space I had available. The plasma cannon above took around twenty hours to print. The whole titan project got started on July 30th with the final cannon popping out of te printer this Wednesday (the 10th of August). It was about two weeks of continuous printing to get here. It also took about two liters of resin, making the total cost in materials (excluding paint, air dry clay, plastic putty and lots of superglue) around 100 euros. Not a bad price for a titan.
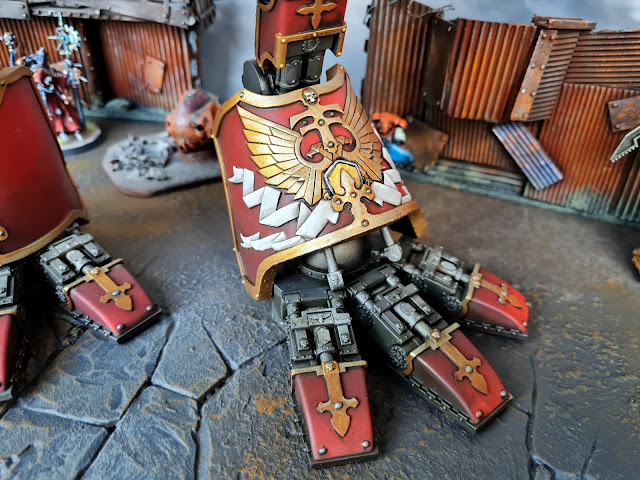 |
| I really like how this leg plate has come out from under the (air-)brush. |
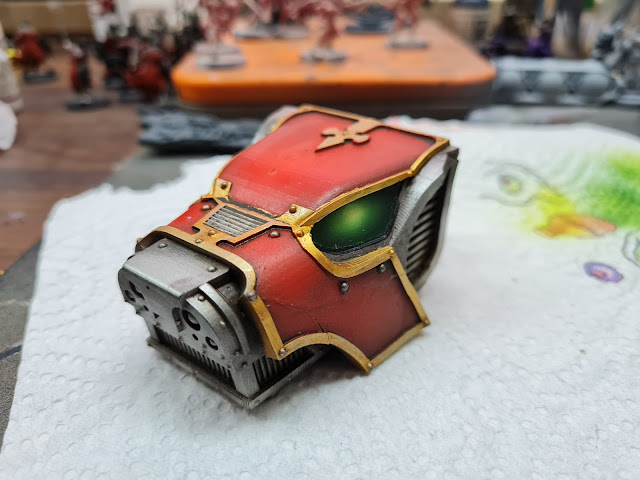
To my surprise it took a lot less effort to paint the model than to print it. Admittedly I could go back in and spend a lot more time actually weathering the feet and joints, making a base and maybe adding a few barrel banners just for fun. I will at some point, but for now I had a blast with it. The golden eagle above was just a bit of Scalecolor Dwarven Gold, a highlight of Vallejo Metal Gold and the 'old streaking grime on top of gloss coat trick. The scrollwork is just a quick bit of wet on wet blending Rakhart Flesh into a random white sitting within reach.
 |
| Blue tack: it's masking tape for lazy painters. |
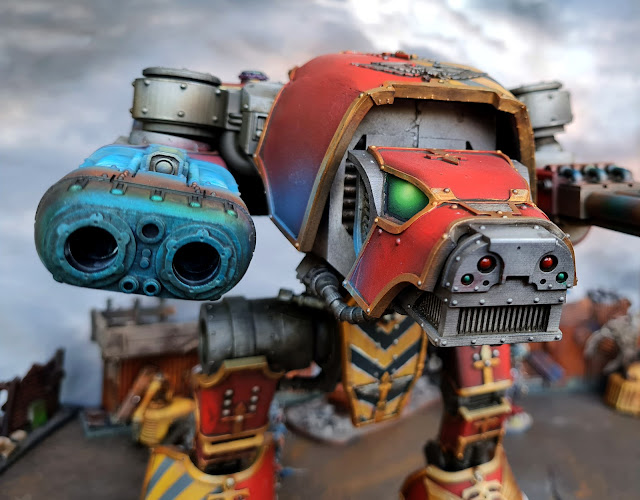
I thought the eyes succeeded rather nicely. To get there it first had to go wrong. I hand painted a layer of Gauss Blaster Green, discovering I forgot to matt coat my gloss coat I inadvertently turned this layer into a crackle paint. Discovering I hated the color anyway, I changed tack. I quickly pushed a bit of Blue tack around the bottom of the eye, using a cocktail stick and a wet q-tip to push the putty properly into place.
 |
| This is starting to look rather menacing. Perhaps I should've decided to go for a chaos titan instead. |
Next I spray painted Vallejo Game Air Dark green into the eye (a ghastly color to apply, no coverage and a fanatical penchant for drooping). I had to apply multiple coats with the airbrush, using a blow dryer in between layers. I added Light Livery Green to the Dark Green, slowly building up a reasonably sinister looking green light in the center of each eye. The very center was airbrushed with a mix of Light Livery Green and White Ink (Liquitex).
 |
| Ouch, the cracks where I stuck the pieces that broke off back on after the fall do actually still show up. I'll just pretend it's battle damage. |
After removing the masking, I used a bit of black paint as 'eye liner' and congratulated myself on achieving a rather nice and menacing look. Hey, if you don't congratulate yourself once in a while, who will? ;).
 |
| I'm personally enjoying how dwarfed the two Primaris Marines look in the background of this picture. |
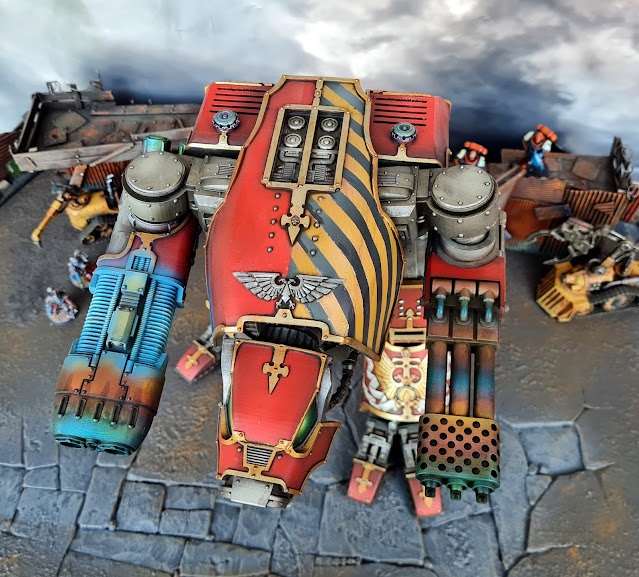
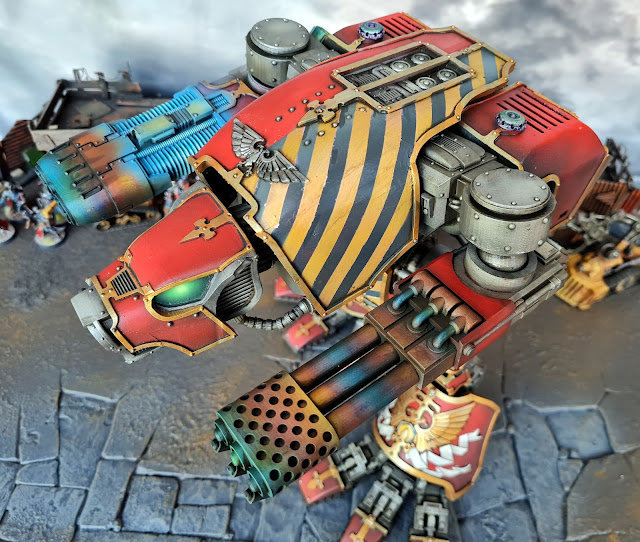
I used masking tape to get the hazard stripes lined up on the back. Using a technical pencil and a triangle (one of those plastic math things with angles I keep forgetting the proper translation for (groan)) I put a 45 degree angle starting from the exhaust center. Then I applied a piece of tape. Using an extra piece of tape I measured out reasonably exact distances between the stripes. Oh yeah I first blasted the entire side with Dark Sea Grey (a wonderful basis for black) with white ink added to add a highlight towards the top.
 |
| I haven't mentioned the red anywhere in the text (it was rather simple to achieve). Its a basecoat of German Red Brown (primer) followed by a light spray of Bloody Red, a few white spots for extreme highlights and then a thin coat of Bloody Red to turn the white red. |
Painting the guns was a blast (pun not intended). I leafed through my Model Masterclass books by Forge World until I found a nice example in the Horus Heresy edition. Starting from a metal base color I applied thinned Minitaire Ghost Tints to the barrel, starting with Plasma Blue, then Purple. For the next ring I used the old Bloodletter Glaze GW doesn't produce anymore (to my regret). I followed up with Lameters Yellow glaze. All layers were applied (thinly) through the airbrush. When I finished up my wife commented the Inferno Cannon reminded her the welding tips her dad used back in the day. I think I can take it I got that right then.
 |
| I'm quite happy with the subtle blue glow on the side of the cockpit and the bottom of the carapace here. |
The final big step after a bit of dabbling around with highlights here and there was an all over airbrushed coat of Streaking Grime over a gloss coat. This stuff is like the Devlan Miracle on steroids. I may need to contemplate laying off it as it almost feels like cheating. Anyway, after letting the grime dry overnight I spent a wonderful afternoon with make-up sponges cleaning the model back to presentable mode. I sealed it all in with a nice matt layer of Polyurethane varnish. I overpainted the Plasma Cannon (I kept adding different forms of glow effects to the coil (it is just so much fun)) in the end I wiped out almost all the work with a light mix of Blue Fluo paint, Electric Blue and White Ink to get some OSL going.
 |
| Remember, you don't have to run faster than the Warhound, just faster then the other Guardsmen around you. What was that about blast radius? |
At this point I will be leaving the project well alone for now. I have a bit of a Skaven obsession going at the moment. I do, however, think I should add a few gun barrel banners at some point. I might have to make a base as well, but I'm not completely sold on the idea yet. So let's finish off with another fun shot.
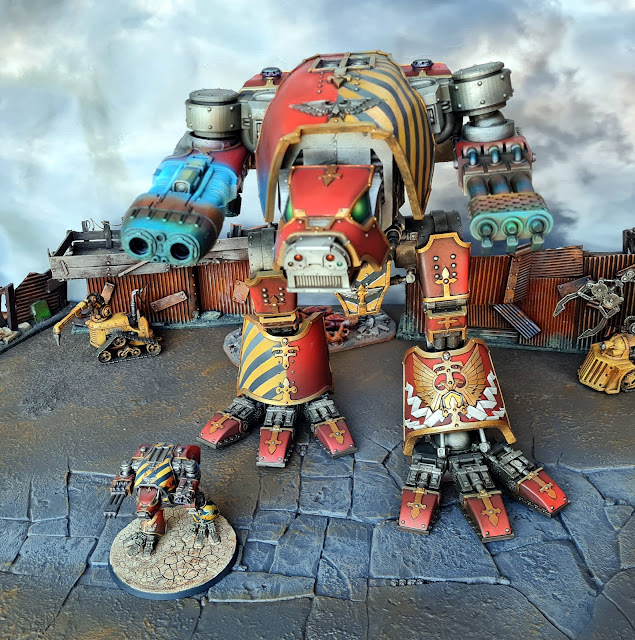 |
| An (epic scale) Imperator class titan supposedly stands somewhere between these two extremes... |
Here's the big titan standing next to its epic brother. Now all I need to think up are two things:
- How do I convince someone to play an actual game against this monster?
- Where on earth will I store it?
- Should I at some point build a Capotiol Imperialis at 28mm scale, or should I use my time more wisely to get a reasonably scaled epic army to complement my titans?
That's all for another time anyways. Here's me signing off for this time. Next up I'll probably be painting more Skaven. Probably...
Great results. Looks like a fun project. At what point is it more economical to by the beast from Forge World? Or is the resin printing still cheap enough to make all the extra effort well worth it? Seems like something one does for the hobby, though, and not to be thrifty...Awesome new Titan!
ReplyDeleteI would still call it hobby country. I've seen the Forge World models and they are seriously well sculpted. This does come close though, but from a cost point of view you'd need to reproduce your own Titan maniple to get anywhere in the cost effective range.....and I'm off to my printer ;)
DeleteSeriously though, the 3D printing stuff is still quite hokey. I'm not sure my titan won't rip itself apart over the next few weeks to name a thing you wont worry about with Forge World models. In a few years I think this will start changing though. And in the meantime I just have more excuses to play with chemicals, paints and whatnot.
wow, thats awesome. i saw the photo and thought, FW monster but no.. a saucy replica and beautifully painted, looks cool. i really like the heraldic leg plate with the scroll and eagle.. how chuffed are you on a scale on 1 to 10? i'm going with a well cheesy 11 out of 10. awesome
ReplyDeleteYou leave me nothing but 12 to chees out to :) I never expected to actually finish the print to be honest (I thought I can always use the head and a few bits as scenery). It is quite an awesome beast now that it 'walks' though. Awesome enough that the banners mentioned above are already drying and wait to be fastened.
DeleteIt's massive! I'm shocked you printed this thing at home! Sure it took a month, but that's a lot of printing of parts! Amazing work on the paint job!
ReplyDeleteThanks. It's sitting on my painting desk because I don't have space in the display cases. It kind of symbolizes my expectations regarding the completion of the model :). I have to admit that I'm slowly starting to wonder if my estimates for an impact of 3D printing on the hobby aren't a bit conservative. Some project brewing right now are pointing in the other direction. (/mysterious foreshadowing ;)
DeleteWow! When you said something big, I was thinking "tank" or another variant of that Skaven monstrosity you painted a month ago... not a titan!
ReplyDeleteLovely colors, and thanks for telling us how the painting was done too.
Now did you magnetize the arms so you can print more guns? A mega bolter would be pretty awesome on there...
Haha, yeah I was going for something truly big (unfortunately all I have left is the term huge if I ever top this one). I did not magnetize the arms. I considered it (and the STL-files offered arms and guns pre-shaped to take magnets) but I really loathe magnetizing things. I decided I'd rather print a second titan at some point and give that the rather awesome looking megabolter (and maybe one of those crazy Ursus claws or a Vulkanite blaster). For now I'm back to a less silly scale :)
DeleteCan you somehow share link to file or stl file itself, cause I wanna print it myself. I'd be so greatful
ReplyDeleteThe file is available here: https://maco3d.com/collections/3d-model-stl-files/mars-warhound-titan-stl-file-for-3d-print/.
DeleteVery nice work. I have just started fdm printing a Warhound, the same files I think. So far just done the head and body. I will be using some of your pictures as reference, especially for the feet and the various piston positions.
ReplyDelete