Time flies. I got my first resin 3D-printer last year and have been toying around with it ever since. I have to say: it is a tool with a learning curve. Last week I added a second 3D-printer to my hobby arsenal, for reasons I'll go into below. Combined with the new 'climate controlled environment' (my 3D-printing tent ;) I'm getting better results and I find myself spending less time scraping resin gunk off reservoirs and more time looking at successful prints. With that I thought it was about time to write a first 'Resin 3D-printing for wargamers FAQ'. Let's go for it.
 |
| I printed the Dragon Crest space ship that is part of the Outpost Origin's collection. |
1. What do I need to get started with this 3D-printing thing?
Let's start with the obvious: a 3D-printer. Shocking, I know. With that out of the way. You'll need a metal scraper and plastic scraper, most likely you'll find these in the box with your resin printer. The metal one is used to separate finished prints from you build plate. The plastic one is used to scrape miserable failures off the bottom of your reservoir. Don't use the metal one in your reservoir, you will damage it. You'll also need Nitril gloves. That's Nitril not Mithril, getting Mithril requires you to dig too deep.
You need the Nitril gloves to protect your hands from the resin and you should get in the habit of wearing them when working around the printer. Resin is not very healthy. I've also picked up a pair of tougher household glove style gloves rated for chemical protection. They are easier to put on and hard wearing. That saves me a ton on Nitril gloves (I only wear these when handling small and slippery prints (like Nurglings). A big roll of cleaning paper is also quite useful as you'll find your primary task while working around the printer consists of cleaning up resin spills, dripped cleaning fluid, etc.
Next up is a bottle of cleaning alcohol. I currently have a 97% purity, but higher is better (I've heard). The standard bottles are 70% as that is the perfect strength to murder germs. We're not murdering germs but removing resin. Cleaning alcohol is necessary to clean up your reservoir after a failed print, clean the plateau, get the residue of bolts and to wipe off flat surfaces. In short: you'll need it to keep you workplace clean. Get a bottle with your new printer.
Last, but certainly not least, you'll need a way to clean excess resin of your freshly printed miniatures. The internet adives IPA (Isopropyl Alcohol for cleaning, not the hipster beer) but I don't use that for cleaning my miniatures. I've bought an Anycubic Wash&Cure 2.0 with my first printer and still use that both to clean excess resin off my prints and to cure the models after washing (for about two minutes (<- bonus answer there ;)). I use a resin cleaner in the wash&cure instead of IPA. It costs a bit more, but is not labeled 'flamable' which makes me sleep a bit sounder.
Almost forgot a last bit you need: a funnel with a filter. When you need to clean the reservoir you need to pour the resin in it back into the bottle. The funnel helps prevent a mess and the filter stops hardened bits of resin from contaminating your supply.
 |
| A rule of thumb when it comes to safety equipment: the easier it is to put on, the more likely it is you won't decide to skip it 'just this once'. These gloves may be a bit too crude for fine manipulation, but for cleaning resin gunk of a reservoir they serve quite well (plus they're easy to put on (safety first)). |
2. What are the important bits on a 3D-printer?
Let's get into how this works first. A resin 3D-printer prints by dunking a big metal plate into a resin filled vat with a transparent bottom. When the build plate is in the right position, a UV light shines in the shape of a single layer, hardening the resin and adding another wopping 0.05 mm layer to your print (or 0.025 if you go crazy for detail). The build plate then lifts, allowing resin to flow back. After a set bit of time and distance the plate is dunked back in again and the next layer is added. Until that magical moment 3 to 18 hours later when your print is finished.
The important bits (from a users perspective) of the printer are the build plate, the reservoir and very specifically the transparant bottom of the reservoir. The build plate itself is fastened with a big screw to the arm that lifts it. You take the plate off the printer when the print is done to get the model of it. In your first week of owning a 3D-printer you will forget to fasten the big screw on top of the build plate, causing a rather miserable print failure. After this mistake you will compulsively check if the screw is tight every time you start a new print (this may just be me).
The reservoir itself is not all that exciting except for one detail: there's a line on it that says: 'max' (or something similar). This is not a suggestion as to what is 'max' even though there seems to be plenty of space for more resin above max. Remember the build plate is dunked into the vat. It has volume and will push the resin to greater heights. Overfilling your reservoir will at a minimum make a horrid mess and most likely lead to a failed print. In the worst case the resin will leak into your printer, giving you an excuse to get an exciting new model printer sooner than you thought (yes I know how to phrase things nicely ;).
The transparant bottom of the reservoir is called the FEP film. FEP stands for Fluorinated Ethylene Propylene (thank you Google). This film has two functions (actually three). For starters it allows the UV light to hit the resin on the bottom of the reservoir. Second it is slightly flexible, allowing the build plate to peel off the print as it rises. It's third function is to keep the resin in the vat (but you could've guessed that). The FEP film is relatively fragile. You need to be careful with the plastic scraper not to punch holes in it or make scratches. It also gets scratched and cloudy over use and at a certain point it'll need to be replaced. You'll know when that point has arrived as there will be mysterious resin residue on you printer after printing and your prints'll start failing. My advice is to buy replacement FEP-film way ahead of time as the shipping time occasionally takes weeks even a month. As it sucks to have to even wait a day for a replacement consumable to arrive, having some spares ready pays off.
 |
| 3D-printing isn't that difficult: you dunk the model in and lift it back out again. Wait a second and repeat. |
3. What resin 3D-Printer should I buy?
My advice to anyone is: 'the one with the biggest build plate within your budget'. The reason I got a second 3D-printer within the year is that I got this advice and decided not to heed it. I figured I'd just be printing cute 28mm models and opted for a higher detail printer with a smaller build plate (around 5x10 centimeter (2x4"). As it turned out I quickly discovered the joys of printing titans (that was quite a feat on a tiny build plate though). Also even if you keep to relatively small models, you need to rotate what you print to get the best results. If your build plate is small, your options are more limited. Getting a bigger build plate helps. As to high detail, I have not noticed serious differences in detail of my models between the newer (less sharp, bigger build plate) and my older (tiny build plate, high detail) printer.
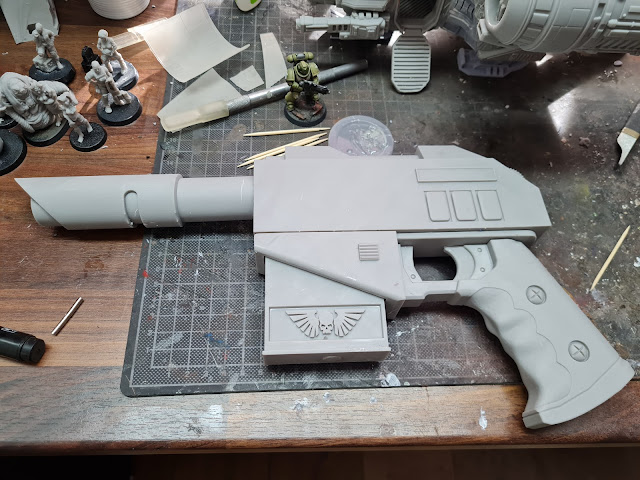 |
| One of my most recent prints was a scale 1:1 laspistol. I'll use it to decorate my wall as soon as it has a layer of paint. |
4. What color of resin should I use?
Grey.
Next question.
...
Oh you want to know why? The color of the resin you use is not just cosmetic (as I thought when I started out). It determines how much light the resin absorbs when the UV-light hits the FEP-film (I'm starting to sound suspiciously like a Star Trek techno-babbler there). Long story (I don't fully comprehend) short: white resins need less exposure time, black resins need more. It varies from brand to brand (and type to type). As the goal of a wargamer is to slap primer and paint on your printed models (and none of us have any unpainted models now, do we?) pick grey. It has larger margin of error when it comes to exposure times, making it easier to work with.
As a bonus hint: before buying a supply of resin, check if the internet has some indication of the proper settings to use it. I know there are all kinds of test files you can print to finetune you own settings to perfection, but I just don't want to waste my time with that. Having ready to use setting makes life so much easier.
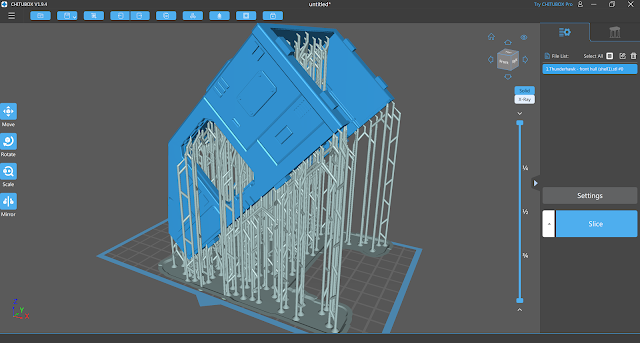 |
| The Chitubox slicer is the first one I learned to use, I'm finding it hard to come to grips with different slicers (although Lychee does look interesting). |
5. What is the best slicer to use?
To print a 3D-model you need to convert a file that describes it, to a language your specific model of printer understands. The standard file format you find on almost any source of 3D models is STL (Standard Triangle Language). You can easily convert STL to whatever you need using a slide rule, pencil, paper and...wait, you can't, sorry, got carried away there. To convert an STL into something your printer can work with you need slicer software that does all the complicating calculating and translating. For resin printers there are three major applications you can work with: Chitubox, Lychee Slicer and Z-suite (there are numerous others, but three sounds oh so authoritative, I just couldn't resist ;)
The first slicer I learned to use is Chitubox. It takes a bit of cursing to get the hang of, but it works ok. Unfortunately the free version does not allow you to edit models beyond hollowing them. I've also been trying Lychee Slicer for a bit. It has a nice feature that allows you to easily add community made resin profiles to your settings. Unfortunately hollowing a model requires the paid version. All in all I want to like Lychee, but I'm just so very used to Chitubox it's hard to switch.
I have not tried Z-suite yet. It is part of the professional tools for 3D-modelers and way outside my budget (although I still dream of learning to sculpt in 3D so who know what the future might bring).
My printer also came with the Photon editing suite. I have not tried that to be honest because its interface looks ancient, and not in an exciting way. Back to the question. I do not have a very good answer to this one. I prefer Chitubox because I got used to it. Every time I need to make a hole in a hollowed out model I dream of better software, but I haven't found it yet. Luckily most slicers have a free version, so experiment to your heart's content.
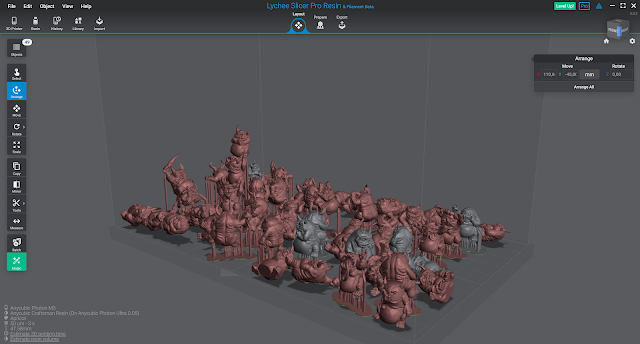 |
| Crawl, my Nurglings, crawl, all over the build plate hihihi. (best read in a cartoon Skeletor voice). |
6. Does it matter how I fill my build plate in the slicer?
The advice I found all over the internet was 'do not overload your build plate'. Me being me, I ignored this completely and I can happily report that you can overload your build plate. The downside here is that a failed print will make the mess bigger.
That being said there are a few considerations. First off never stick any part of your model directly to the build plate. A lot of files on the internet are made to stick to the plate, but that's usually meant for people using PLA printers. In resin it will come off you plate ugly. I always use a sled and supports. The sled is a basic layer of resin that adheres to the build plate and helps the actual print hang on better, the supports are what the actual model is hanging from (there's a lot more to it than just that, but let's leave it here for now).
Another important thing to remember is that you should never put a large flat surface parallel to the build plate. It will deform. The first few layers you print are very thin and they get dragged up and down through your viscous resin, causing them to ripple. If you want to print a large flat surface (for instance one part of your space ship that need to stick to another), make sure it is at an angle to the build plate. I aim for 45 to 65 degrees, depending on how much space I have to manoeuvre my model. It will be printed as a wedge and will be solid enough to keep its shape when the drag from the resin because of its size becomes an issue.
A last, but certainly not least, consideration is the position of what you print relative to the build plate. The part of the model facing away from the build plate will come out looking better than the part facing it. This is mostly because supports holding your model leave small marks. So if what you print has a face, dunk it in the resin face first (so to speak).
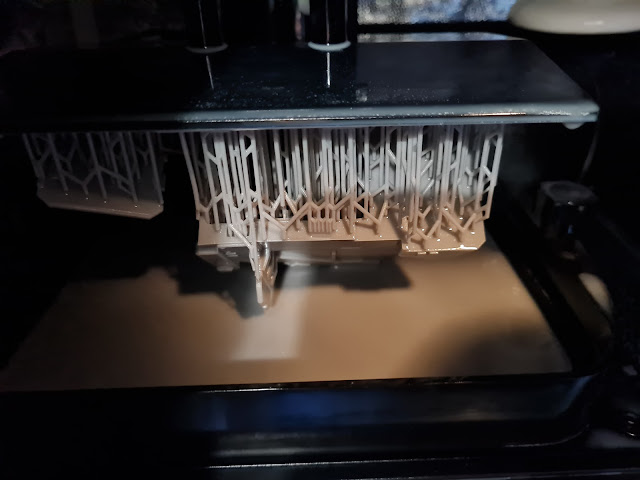
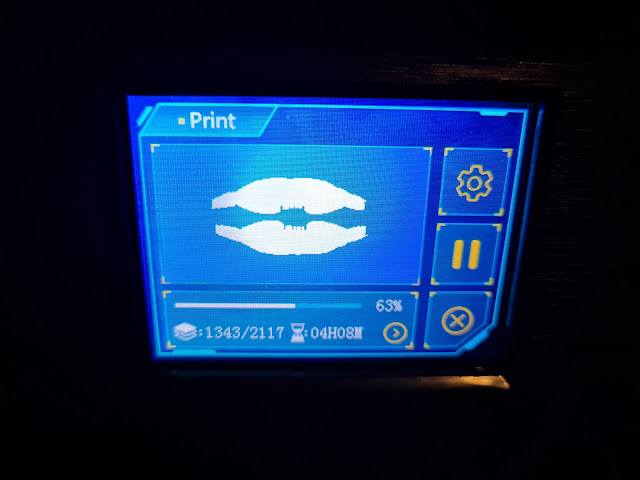 |
| The print's at 63 percent, almost done, just four more hours left. Also: is it just me, or does it look like the 3D-printer is blowing me a kiss? |
7. What is the easiest way to get the supports off my print?
After your model is printed it will be covered in supports. Mostly you can just break these off, but sometimes they stick a bit more than they should. This can cause damage to your freshly printed model. Luckily you followed along with question 6 and had all the important detail facing away from the build plate... Still, a very useful trick to cleanly breaking off supports is to place your 3D-print in a tub of warm water (not boiling, just tap warm). Warm resin is a bit more flexible and this makes snapping off supports a breeze.
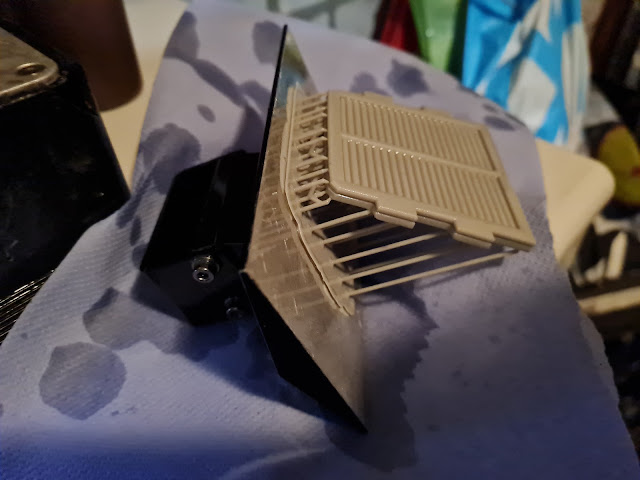 |
| When the print is finished all you need to do is remove it from the build plate and take off the supports. |
8. Where can I get models?
Everywhere! Well in a lot of places. My personal favorites to hunt for STL files are Cults3d and MyMiniFactory. Of the two Cults3d has slightly more models with my favorite price tag (free). The downside of Cults3d is that it has a lot of mediocre models in store; finding a cool one takes more time. MyMiniFactory mostly offers paid for models, but the quality of the 'sculpts' on average is higher than what you find on Cults3d. Aside from these sites, there's plenty of other places that have STL files on offer. Google 'whatever you want' in combination with 'STL' and you will net results. For the fellow Oldhammer enthousiasts on this blog: Bob Naismith runs his own STL store. I'm planning to buy my first model from him soon, so more on that at a later date.
 |
| I'll be painting the other terminals soon now. |
9. Should I become a Patreon? Join a Tribe?
A lot (almost all) the people offering STL files seem to have a Patreon page or a Tribe (MyMiniFactory) set up. For an x-amount every month, you get a batch of new designs delivered straight to the waiting maw of your printer (well to your slicer, but close enough). The advantage is that you get to sponsor your favorite artist(s) and that you get a lot of files at a discount. The disadvantage is that the lead pile, the plastic pile and the resin pile now get a digital twin (sorry SAP, I'm stealing the term). It takes a lot of time to print a model. I've joined one tribe and I haven't gotten around to printing most of the models there just yet. So I would advice temperance when it comes to Patreon's and Tribes. Better yet, put the brakes on when it comes to impulse buying models. My trick it to bookmark models instead of buying or downloading them. It's cheaper, takes up no space on my harddrive and a bookmark is easier to find than a file I really, really wanted to print six months ago (and stuffed somewhere in the '3D prints' folder). Your mileage may vary of course.
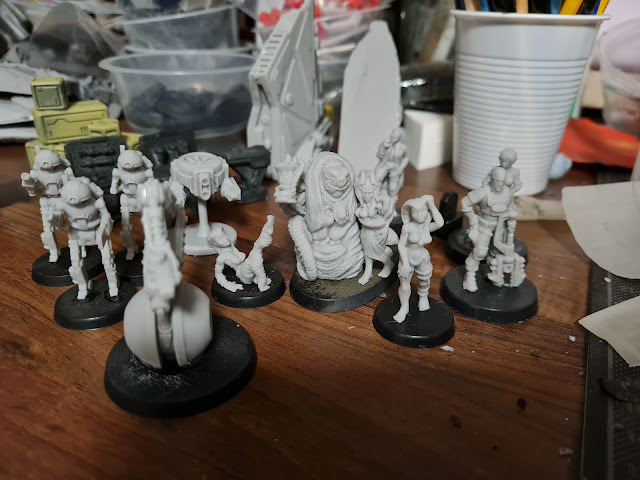 |
| Ah more miniatures to paint. Excellent. |
10. Will you stop printing new miniatures until all the old ones are painted?
No.
Ah I see now what you meant with the 3D printing stuff, really well laid out explanation for beginners. There's not enough of this kind of stuff that talks about the pros and cons without being overly-hyped.
ReplyDeleteThanks. I thought it'd be interesting to get the wargaming perspective firmly in place here. Most articles around the subject assume the printing itself is the hobby.
DeleteVery interesting and informative. (I realise I'm sounding like one of those spam posts).
ReplyDeleteI don't think I'll be investing at my age, but I have friends who 3D print and now I've a better idea what they are talking about.
The results can certainly be stunning.
When it works it's awesome. Unfortunately it's a bit like getting a regular printer to work in the early eighties :).
DeleteI was a printer in the early eighties (local newspaper). I know exactly what you mean
DeleteGood job I can't afford to go down this rabbit-hole, I'd end surrounded by hundreds and hundreds of miniatures, its safer for me to buy 3D printed minitures premade. I'll leave you printing trailblazers to the pioneering work, the unsung heroes of this new age of miniatures.
ReplyDelete"Surrounded by hundreds and hundreds of miniatures", is an apt description of my situation :D Cheers to the heroes thing although I think madmen is a more apt description ;)
DeleteThis seems to be a great comprehensive breakdown. Awesome work! I don't print myself, but I'm going to send it to my buddy who does!
ReplyDeleteThanks, curious to hear what he thinks. After all, the above is just my one take on all the resin sploshing madness that is 3D-printing.
Delete