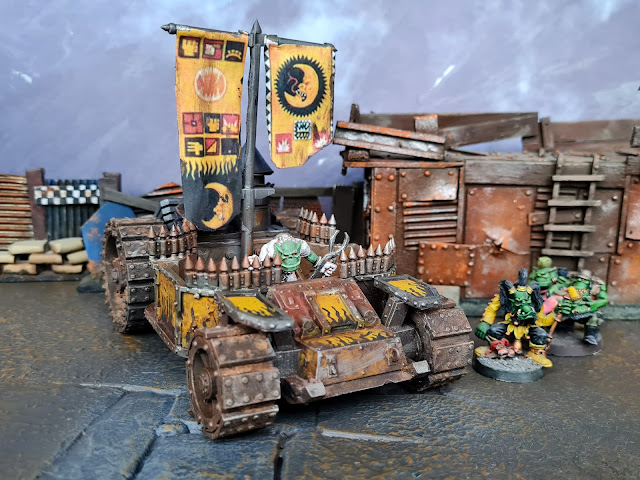
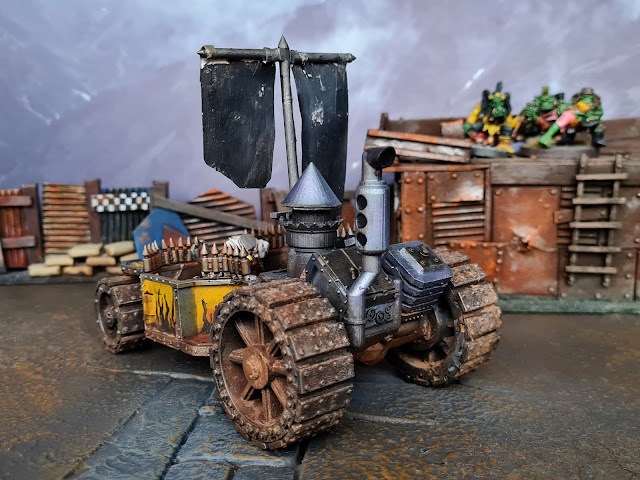
One of the best gaming supplements ever written - as far as I'm concerned - is Waaargh the Orks. After fleshing out Chaos in the venerable Realm of Chaos books GW decided to really keep going and give their Space Orks some background. I bought the book way back when it came out in 1991. Even though I curse the decision to give it pre-punched holes for a binder and forsake any glue for the cover I still love it. I even attempted to start a Space Ork army way back then (and sold of most of my models over the years). One of the things I never bought when it came out was a classic Space Ork Battle Wagon (I couldn't scrape the funds together for a full mail order and there was no GW point of sales within reach way back then (and no internet*). Thanks to the miracles of 3D-printing I now have one. Obviously it had to be covered in paint as quickly as possible. No need to paint it red, you don't have to go fasta' when you'z got lots'a teef!
* A horrifying thought, I know
 |
| "Fasta' you zogs! We needz'ta leave! 'Oo knows what'll happen when two weirdboyz call shotgun at da same time." |
 |
| 3D-printing: it takes a lot of effort to get to grips with it, but it is quite rewarding when it works. |
It took my Anycubic Photon Ultra about four days to spew out the different parts. I ran into a bit of trouble because I tried a new slicer (the software that combines the design (stl) you buy with the specifications of your printer and info on the resin you use, turning this information into a file your 3D-printer actually understands). I added rather thick supports in Lychee (name of the slicer) and couldn't properly get them off the tub-shape that serves as the open topped cabin of the vehicle. It left marks and damage. On the plus side, it left marks and damage, which only serves to make an Ork vehicle look properly Orky. For future reference (and as a handy tip for fellow 3D-printing wargamers out there): if you have trouble taking supports off, leave the print in a bowl of warm water for a few minutes, this heats the resin up and makes supports break off without a problem.
 |
| The magic of weathering powders and (reasonably) properly applied colored metallics. |
I ran into a second problem while printing the front wheels as the STL turned out to be damaged. I shot off a quick message to the creator, hoping for the best. To my amazement I got a reply and fixed files within the hour. I challenge anyone to beat that for service on a four dollar file (thank you Landon Alumbaugh). With that said, all that was left was printing the vehicle. I airbrushed the entire thing with Vallejo Metal Steel and followed up with a quick VM Dark Aluminum zenithal. Next I brushed two thin layers of GW Averland Sunset on all the panels I wanted to be yellow. After this dried, I airbrushed a random light yellow in the center of each panel.
With the basic colors in place I went over everything I felt like with my standard rust recipe (Vallejo Red Brown, Rust, Hot Orange and a GW Ryza Rust drybrush/stipling followed by a very light metallic drybrush). I painted the black flames with a brush using Nato Black. Now it was time to go wild with the weathering. I started with Typhus Corrosion around the edges of the cabin and in select other places. I followed this up with weathering powders. I applied multiple layers of dusty browns on the wheels, added rust powders around the rust and used sooth and iron filing powders on the engine. I used white spirit to set the powders and when this dried I sealed it all in with a lot of matt varnish.
 |
| The bottom of this buggy started in prim looking metal colors. You've got to love what an airbrush and a bit of weathering can do to that. |
Now all I had to do was restore a semblance of detail as I got a bit too wild with the powders. I drybrushed a bit more metal paint on the wheels and bottom of the cab. The engine was too black so I used a trick I picked up a few years ago to restore the heated metal look. Instead of washing clean metal with purple and blue shades, I airbrushed streaks of purple and blue metallic paint in strategic places. As a final huzza I printed two classic Bad Moon banners from Waaargh the Orks. I used a lighter to burn of bits on the bottom before glueing the pieces of paper to the mast. Next I painted the top bits of the paper in a metal color and the back in Nato Black. As a final step I painted both the front and the back with a layer of PVA to give them a bit of body. I finished up with a thick coat of matt varnish on the banners to take the sheen off the PVA.
 |
| Banners are making a bit of a comeback on recent GW models, but they're not at the good old days of multiple paper banners, back banners and spear banners yet. |
And just like that I finally have a proper Battle Wagon for a classic Rogue Trader type Bossnob to drive around camp with and shout random orders at Da Boyz. Someday soon I will paint the classic Bossnob I have squirreled away somewhere. For those of you wondering: yes I'm scouring the internet looking at classic style mesh armored Orc Boyz in STL. I've found a few interesting looking options, but I'm not fully sold on any of them so far. We'll see what the future brings (Battle at the Farm one day (most likely when I'm old and grey (older and greyer ;))).

Now thats a set of snazzy wheelz, phwoar! Impressive. I love how this has been recreated by someone and made available, still think its a great looking model and embodies the spirit of the cobble-it-together orks, bulky, brutal, shabby and fun.
ReplyDeleteNice to one of my favourite odd boyz carrying the big pliers, good for teef and gubbinz.
Cheers, I hadn't given a thought to the ol' Painboyz pliers there. Incidentally he's the first model I painted up after a long hiatus in the hobby. I think that was somewhere around 2008. Looking at the picture again, I think I still have to finish his base (lol).
DeleteGreat model and fantastic paint job! I especially like the Bad Moon banners, fits the old-school aesthetic really well.
ReplyDeleteThanks, it's quite satisfying to add an old school banner to an old school project :)
DeleteVery nice. I particularly like the weathering. This takes me back a few years! I always wondered who was meant to be driving these things. I think there was a rule that you could load up a battlewagon with as many orks as you liked, but any that fell out as you pushed it across the table took a hit!
ReplyDeleteI think there's a grot hiding beneath the hatch in the center of the front of the vehicle (or an Orc lacking enough teef to buy a new set of legs). That stacking rule is quite funny, wasn't something similar included in the Gorkamorka game?
DeleteI wouldn't be surprised. I never got to play Gorkamorka, but I've heard that it was a lot of fun!
DeleteReally cool what you can do with 3D printers nowadays, good job.
ReplyDeleteCheers, I've got some other projects on the build plate and I must admit it's pretty spectacular. More on that later :)
DeleteThunk! That's the sound of my jaw dropping.
ReplyDeleteThat looks amazing. It's always good to see classic Orks.
Thanks. Classic Orks are awesome, selling a bunch off is one of my bigger hobby regrets.
DeleteMine too, but I'm slowly rebuilding a Rogue Trader Ork force.
DeletePropa Orky that one 's. Love it.
ReplyDeleteAnd Double Dakka is amazing, and yo should do it (and paint it red of course!)
I'm putting it down on the list :)
DeleteWow! That's awesome! Love the colors and weathering on that thing. I don't really use vehicles much these days... but in the off chance we ever play Gorkamorka I'm going to have to keep this in mind!
ReplyDeleteIt's a wonderfully zany kit (and doubly wonderful that 3D-printing makes it available again).
DeleteHave you looked at Trollet Miniatures for classic looking orks? https://www.myminifactory.com/users/Trollet%20miniatures
ReplyDeleteI think they're great and they're modeled after the Paul Bonner illustrations from Waaargh the Orks