After the epoxy resin disaster
last week I decided to redouble my efforts to complete the Mighty Fortress. It paid off as the old polystyrene model now stands ready for battle. Lets start off with a few pictures of the completed set.
 |
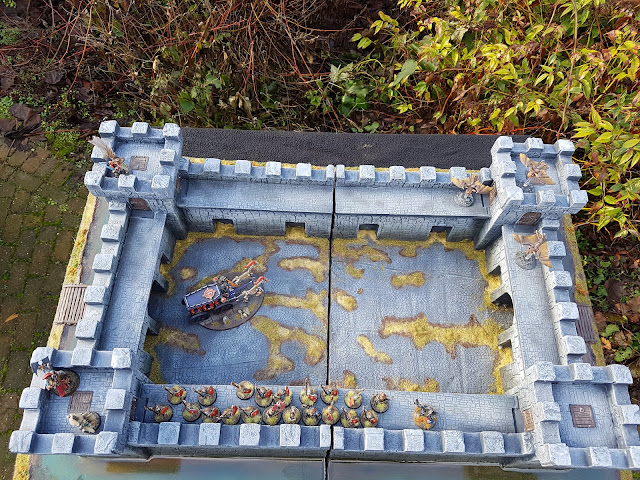
| The Mighty Fortress is an epic piece of scenery to put on a gaming table. |
I had to replace the bridges for both entrances as the previous ones where destroyed while removing the badly mixed epoxy resin. I took the opportunity to improve on the previous versions. I made the new bridges slightly shorter. Instead of bending them in advance, I brok off the front parts as needed to fit. I also added a raised edge to the bridge to make it look slightly more like a serious piece of carpentry.
 |
| You can see the discoloration in the moat on the left where the old resin lies submerged beneath the fresh layer. Not quite the 'it all flows together seamlessly' the internet promised me. |
I'll continue with a shot from the other side of the castle. This thing is unbelievably big. It easily fits a 2000-3000 points of a matched play AoS army. This side of the model is the one that came out the worst for wear from the resin accident as part of the old layer did actually set and was impossible to remove. I was planning to embellish the discoloration in the water by using some old green flock as duckweed, but I seem to have lost that flock.
 |
| Flocking is an art form you really start to appreciate when you dive deeper into the Oldhammer part of the hobby (assuming you avoid getting drafted by the Goblin Green base brigade). |
The combination of cobblestones, sand and a few variants of static flock with tufts has turned out quite well on the courtyard (I think). So far I had only tried this with smaller bases so it is a relief that it worked out. For those of you wondering, the big gap between the two pieces is caused by bits of resin sticking out (and refusing to be sandpapered off) and the MDF slightly warping during the build. I'll learn to live with it.
 |
| The fortress easily fits twenty (dead) men on top of the wall with an added hero and then it still has room to spare. |
To round of the finished pictures, here's a shot with a group of properly aged models on the wall. I can't wait to fight a few battles over (part of) this fortress. Although I'm still planning to build a few themed pieces of hoarding first, just to round it all off. Let's quickly add a few pictures of the final painting and building steps for completeness sake.
 |
| Attempting to fix the damaged moat. |
After scraping off the gooey failed resin and breaking away half-set bits I ended up with quite a lot of damage to the moat. I first re-primed all these areas grey. After that I repainted these areas as close a I could to the rest of the moat. I would've repainted the entire moat, but there where bits of resin that actually did harden, and these proved impossible to shift. After fixing the paint on the river I mixed up a fresh batch of resin and stirred, and stirred, and stirred (oh how I stirred) and finally took a deep breath and poured it out.
 |
| I had to pour a fresh layer of resin. Unfortunately I had to pour over the edge of the bank of the moat to cover the old bit of resin, causing the entire moat to overflow. Sharp readers will spot the blue-tac barrier on the upper right of the corner. This actually does work if you want to stop resin from flowing of your model. |
As the resin set, the freshly painted bits of moat discolored, making the repairs painfully obvious. As the resin is on top of it, there is little I can do about this. I did mix the resin properly this time, so the next morning it had hardened to a 'don't even think about removing me' hardness.
 |
| The overflown epoxy resin was easily covered with a PVA and sand mixture. |
I poured a bit more resin into the moat then actually fit. I had to as I wanted to cover old bits I couldn't remove. According to some internet tips I found new resin should merge perfectly with older layers. That turned out to be rather untrue for my model. I made a mix of sand, pva, burnt umber paint and a bit of water and re-textured (and repainted) the entire moat's edge.
 |
| Note to self: vacuum the hobby room. Flocking large surfaces is a messy business. |
After the moat (and the new edge) completely dried I took an old brush, more PVA and applied grass tufts, followed by a few different colors of flock. I also applied some coarse turf to the bank of the moat. I waited a few hours for the PVA to dry and then shook off the excess. I finished off the fortress by covering all the polystyrene with a layer of textile hardener. I got this tip of the owner of
Shifting Lands. Textile hardener dries transparent and matte (as opposed to PVA that dries with a light sheen). It forms a thin layer of plastic on the entire fortress protecting the paint and the soft material.
To finish up, here are some extra shots of my Mighty Fortress, now on to building hoarding (and a bunch of other projects).


This is fantastic!
ReplyDeleteThis fortress is mighty. Great job !
ReplyDeleteTremendous work! I actually really like how the new moat is deeper and touches the castle walls. Gives it more of a "slowly sinking into a bog" feel that suits warhammer.
ReplyDeleteThanks. One of the towers is on slightly crooked (add character *cough* *cough*) but your comment gives me the right dialogue for the lord of the castle: "Everyone said I was daft to build a castle on a swamp, but I built in all the same, just to show them. It sank into the swamp. So I built a second one."
DeleteYes, exactly so!
DeleteAside from the hoardings, are you going to make any other castle related items? Interior buildings? Keep? Watch tower?
Aside from the hoarding I was thinking about some 'Hollywood style' buildings that can be leaned against the inner walls (stables and the like) with 'catch a stuntman' thatched roofs. I do have to admit that my painting station has somehow gotten overrun by Eldar these past few days (I've actually done a quick repaint on six Shining Spears Monday evening) so take all plans with the good 'old Wargamer grain of salt :)
DeleteLooking great! The MF being set up takes me back to being besieged or laying siege to them in the 90s :)
ReplyDeleteNice, you've played Warhammer Siege? How was it as a game? I have to admit my memories of the expansion are limited to drooling over the expansion book.
DeleteLooks incredible! I'm so glad you managed to repair everything after the "incident"...
ReplyDeleteTanks, it was a relief that it came more or less together in the end.
DeleteNice save! Looks really good. And man, that thing is huge. Didn't really get a sense of the size of it until I saw it with the dudes on the wall there.
ReplyDeleteThanks yes I took the 'duded' pictures after writing half the blog when I realized pictures fail to convey the scale of this thing. It literally takes up two thirds of a modern 6x4 gaming table. It is huge.
DeleteThe fortress looks great, I’m glad you survived the second moat - it still looks cool to me. Maybe you can add some brass etch water lilies to the not so perfect bits to cover them, but it seems minor in light of the finished result :)
ReplyDeleteThanks, I'm quite happy I persevered too. Etched brass lilies sounds interesting, especially as I've never used etched brass before. I'm going to look into that.
Delete